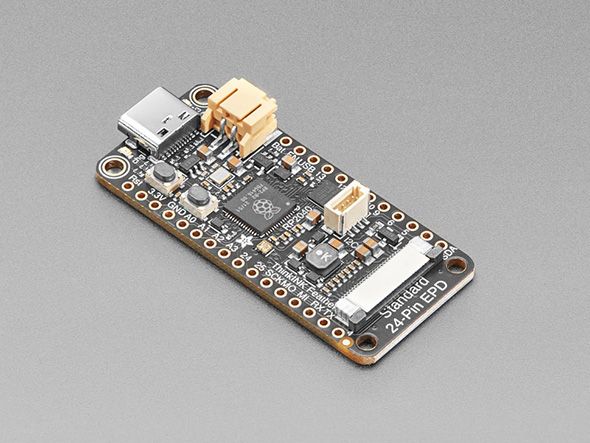
Feather RP2040 ThinkInk via U2IF by Adafruit
This board uses the U2IF firmware to communicate with Blinka and is run on the attached system via USB. See the Installation Instructions for more info.
Easy e-paper and RP2040 finally come to your Feather with this Adafruit RP2040 Feather Think Ink that’s designed to make it a breeze to add almost any common e-Ink/e-Paper display. Chances are you’ve seen one of those new-fangled ‘e-readers’ like the Kindle or Nook. They have gigantic electronic paper ‘static’ displays - that means the image stays on the display even when power is completely disconnected. The image is also high contrast and very daylight readable. It really does look just like printed paper!
We’ve liked these displays for a long time, and we’ve got Arduino/CircuitPython drivers for tons of the various display chipsets, so wouldn’t an e-paper RP2040 Feather make a ton of sense? Luckily for us, just about every small-medium size EInk display made these days has a standard 24-pin connection. This Feather will add all the power supply support circuitry and level shifting so you can attach your favorite display - we’ve tested it with up to 5.6” sized 7-color ACeP displays.
Since all ePaper displays with the 24-pin interface require you to buffer the layers of data and write them all out at once over SPI, the RP2040 chip is an excellent driver. It has 264K of internal SRAM so even with the largest displays, there’s plenty of memory to store all the image data plus run your own code. We also put the display on it’s own SPI port so that the Feather’s main SPI port can be used for other peripheral devices.
Feather is the development board specification from Adafruit, and like its namesake, it is thin, light, and lets you fly! We designed Feather to be a new standard for portable microcontroller cores. We have other boards in the Feather family, check’em out here.
At the Feather’s heart is an RP2040 chip, clocked at 133 MHz and at 3.3V logic, the same one used in the Raspberry Pi Pico. This chip has a whopping MB of onboard QSPI FLASH and 264K of RAM! There’s even room left over for a STEMMA QT connector for plug-and-play of I2C devices.
To make it easy to use for portable projects, we added a connector for any of our 3.7V Lithium polymer batteries and built-in battery charging. You don’t need a battery, it will run just fine straight from the USB Type C connector. But, if you do have a battery, you can take it on the go, then plug in the USB to recharge. The Feather will automatically switch over to USB power when it’s available. While the RP2040 is not designed for low power usage - you can get down to about 1.5mA of power draw in sleep mode.
Here’re some handy specs! You get:
- Measures 2.0” x 0.9” x 0.28” (50.8mm x 22.8mm x 7mm) without headers soldered in
- Light as a (large?) feather - 6.3 grams
- RP2040 32-bit Cortex M0+ dual core running at ~133 MHz @ 3.3V logic and power
- 264 KB RAM
- 8 MB SPI FLASH chip for storing files, images and CircuitPython/MicroPython code storage. No EEPROM
- Tons of GPIO! 21 x GPIO pins with following capabilities:
- Four 12-bit ADCs (one more than Pico)
- Two I2C, Two SPI, and two UART peripherals, we label one for the ‘main’ interface in standard Feather locations
- 16 x PWM outputs - for servos, LEDs, etc
- Built-in 200mA+ lipoly charger with charging status indicator LED
- Pin #13 red LED for general purpose blinking
- RGB NeoPixel for full-color indication.
- On-board STEMMA QT connector that lets you quickly connect any Qwiic, STEMMA QT or Grove I2C devices with no soldering!
- Both Reset button and Bootloader select button for quick restarts (no unplugging-replugging to relaunch code)
- USB Type C connector lets you access built-in ROM USB bootloader and serial port debugging
- 3.3V regulator with 500mA peak current output and power enable pin
- 4 mounting holes
- 12 MHz crystal for perfect timing.
- Support circuitry for common 24-pin e-Paper/e-Ink displays. These tend to be 1.54” to 7” diagonal and designed for ‘smart labels’. No soldering required, simply plug in the display to the FPC connector on the end and load up your code. Not for use with the larger resolution displays on e-Readers like Kindles. Those use a different interface!
Purchase
Contribute
Have some info to add for this board? Edit the source for this page here.
Adafruit Blinka Installation
We use a special library called adafruit_blinka (named after Blinka, the CircuitPython mascot) to provide the layer that translates the CircuitPython hardware API to whatever library the Linux board provides.
For example, on Raspberry Pi we use the python RPi.GPIO library. For any I2C interfacing we'll use ioctl messages to the /dev/i2c device. For SPI we'll use the spidev python library, etc. These details don't matter so much because they all happen underneath the adafruit_blinka layer.
