MONSTER M4SK
by Adafruit

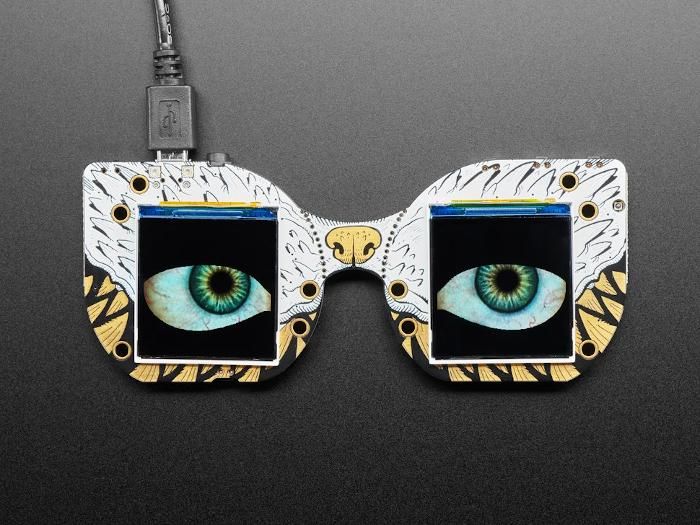
Peep dis! Have you always wanted to have another pair of eyes on the back of your head? Or outfit your costume with big beautiful orbs? The MONSTER M4SK is like the Hallowing but twice as good, with two gorgeous 240x240 pixel IPS TFT displays, driven by a 120MHZ Cortex M4 processor that can pump out those pixels super fast. You’ll get the same quality display as our Raspberry Pi Eyes kit but without needing to tote around a full Linux computer
This unique design has the eyes at the same pupil-distance as a human (~63mm) but is designed so that the nose section can be broken apart with pliers/cutters and then wired together with a 9-pin JST SH cable up to 100mm long so the eyes can be re-positioned or freely attached.
We wanted to make audio-effects easier so in addition to a class D audio amp, there’s also a stereo headphone jack that is connected to the two DACs on the chip. Use it when you want an externally sound amplifier box for big effects. For small portable effects, the built-in amp can drive 8 ohm speakers up to 1 Watt.
On each side are JST-PH plugs for connecting external devices. The 3-pin JSTs connect to analog/timer pins on the SAMD51, so you can use them for sensors or GPIO devices. The 4-pin JST connector connects to the I2C port and you can fit Grove connectors in it for additional hardware support. For the PDM mic port, you can use this cable to wire to a PDM mic.
There’s also plenty of sensors built in - light sensor, 3 tactile buttons, and a capacitive touch pad on the nose.
Speaking of that nose, the silkscreen is by the skillful Miss Monster, check out those fangs!
This is by far the cutest, creepiest and most incredible development board we’ve made so far! Gaze upon these features:
- ATSAMD51G19 Cortex M4 microcontroller running at 120MHz with 512KB Flash, 192KB RAM
- 8 MB QSPI flash for storing graphics and sound effects
- Two 240x240 IPS TFT displays each on their own SPI bus
- Beautiful silkscreen with a boop-able nose that is a capacitive touch pad
- Lipoly battery charge circuit for portable use
- Stereo headphone jack out, for sound effects via an amplifier
- Mono speaker driver for smaller 8 ohm 1W speakers
- One 4 pin STEMMA JST connector for I2C connection (also Grove compatible)
- Two 3 pin STEMMA JST connectors with digital/analog/PWM for servos, sensors, etc
- One 4 pin JST SH port for connecting an optional PDM microphone
- Backlight controls
- Three tactile buttons
- Light sensor
- On/Off Switch and reset button
Tutorial
Purchase
Contribute
Have some info to add for this board? Edit the source for this page here.
CircuitPython 9.2.1
This is the latest stable release of CircuitPython that will work with the MONSTER M4SK.
Use this release if you are new to CircuitPython.
Built-in modules available: _asyncio, _bleio, _pixelmap, adafruit_bus_device, adafruit_pixelbuf, aesio, alarm, analogio, array, atexit, audiocore, audioio, audiomixer, audiomp3, binascii, bitbangio, bitmaptools, board, builtins, builtins.pow3, busdisplay, busio, busio.SPI, busio.UART, codeop, collections, countio, digitalio, displayio, errno, fontio, fourwire, framebufferio, frequencyio, getpass, gifio, i2ctarget, io, jpegio, json, locale, math, microcontroller, msgpack, neopixel_write, nvm, onewireio, os, os.getenv, ps2io, pulseio, pwmio, rainbowio, random, re, rotaryio, rtc, samd, sdcardio, select, storage, struct, supervisor, synthio, sys, terminalio, time, touchio, traceback, ulab, usb_cdc, usb_hid, usb_midi, vectorio, warnings, watchdog, zlib
Features: Display, Battery Charging
Absolute Newest
Every time we commit new code to CircuitPython we automatically build binaries for each board and language. The binaries are stored on Amazon S3, organized by board, and then by language. These releases are even newer than the development release listed above. Try them if you want the absolute latest and are feeling daring or want to see if a problem has been fixed.
Previous Versions of CircuitPython
All previous releases of CircuitPython are available for download from Amazon S3 through the button below. For very old releases, look in the OLD/ folder for each board. Release notes for each release are available at GitHub button below.
Older releases are useful for testing if you something appears to be broken in a newer release but used to work, or if you have older code that depends on features only available in an older release. Otherwise we recommend using the latest stable release.
Update UF2 Bootloader
Latest version: v3.15.0
The bootloader allows you to load CircuitPython, MakeCode, and Arduino programs. The bootloader is not CircuitPython. You can check the current version of your bootloader by looking in the INFO_UF2.TXT file when the BOOT drive is visible (FEATHERBOOT, CPLAYBOOT, etc.).
It is not necessary to update your bootloader if it is working fine. Read the release notes on GitHub to see what has been changed. In general, we recommend you not update the bootloader unless you know there is a problem with it or a support person has asked you to try updating it.
To update, first save the contents of CIRCUITPY, just in case. Then double-click the reset button to show the BOOT drive. Drag the update-bootloader .uf2 file to the BOOT drive. Wait a few tens of seconds for the bootloader to update; the BOOT drive will reappear. After you update, check INFO_UF2.TXT to verify that the bootloader version has been updated. Then you will need to reload CircuitPython.
