
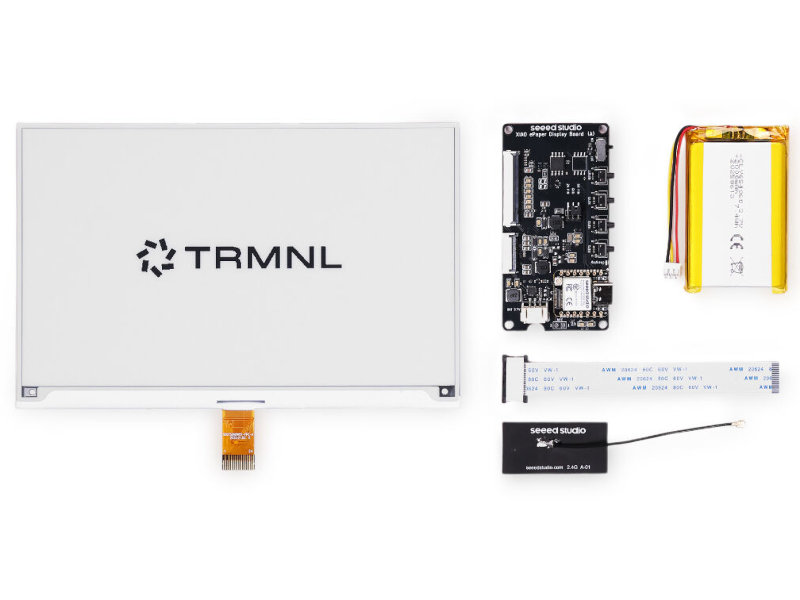
Seeed Studio XIAO ESP32-S3 TRMNL DIY Kit by Seeed Studio
The TRMNL 7.5” (OG) DIY Kit, co-developed by Seeed Studio and TRMNL, is a versatile e-ink development solution. It includes a 7.5-inch 800x480 monochrome e-ink display, XIAO ESP32-S3 PLUS driver board, 2000 mAh rechargeable battery, and 10cm FPC extension cable.
Perfect for DIY enthusiasts building e-ink dashboards, smart home interfaces, or creative digital signage—offering low-power efficiency and endless customization.
Features
-
Powerful MCU Board: Incorporate the ESP32S3 32-bit, dual-core, Xtensa processor chip operating up to 240 MHz, mounted multiple development ports, Arduino / MicroPython supported
-
Great Memory for more Possibilities: Offer 8MB PSRAM and 16MB FLASH
-
Outstanding RF performance: Support 2.4GHz Wi-Fi and BLE dual wireless communication, support 100m+ remote communication when connected with U.FL antenna
-
The board has a power-switch, three user buttons and one reset button
-
A JST-PH3 connector supports charging of LiPos with a thermistor. The kit includes a 2000 mAh rechargeable battery.
-
Two connectors (24 pin and 50 pin) support various e-ink displays.
-
The kit includes a 7.5” monochrome e-ink with four gray levels
The CircuitPython version for this kit also supports the bare driver board sold seperately (EE04).
Purchase
Getting Started
Seeed Studio getting started guide for the hardware can be found here. For loading CircuitPython follow the same process as other ESP32-S3 based devices.
Contribute
Have some info to add for this board? Edit the source for this page here.
CircuitPython 10.3.1
This is the latest stable release of CircuitPython that will work with the Seeed Studio XIAO ESP32-S3 TRMNL DIY Kit. Use this release if you are new to CircuitPython.
Modules included in this download
_asyncio _bleio _bleio (native) _pixelmap adafruit_bus_device adafruit_pixelbuf aesio alarm analogbufio analogio array atexit binascii bitbangio bitmapfilter bitmaptools board builtins builtins.pow3 busdisplay busio busio.SPI busio.UART codeop collections digitalio displayio dualbank epaperdisplay errno espidf espnow espulp fontio fourwire framebufferio getpass gifio hashlib i2cdisplaybus io ipaddress jpegio json keypad keypad.KeyMatrix keypad.Keys keypad.ShiftRegisterKeys keypad_demux keypad_demux.DemuxKeyMatrix locale lvfontio math mdns memorymap microcontroller msgpack nvm onewireio os os.getenv pulseio pwmio random re rgbmatrix rtc sdcardio sdioio select sharpdisplay socketpool socketpool.socketpool.AF_INET6 ssl storage struct supervisor supervisor.get_setting sys terminalio tilepalettemapper time touchio traceback ulab usb_cdc usb_hid usb_midi vectorio warnings watchdog wifi zlibFeatures: Bluetooth/BTLE, Battery Charging, External Display, USB-C, Wi-Fi
CircuitPython 11.0.0-alpha.2
This is the latest development release of CircuitPython that will work with the Seeed Studio XIAO ESP32-S3 TRMNL DIY Kit.
WARNING: On Espressif ESP32-S2 and ESP32-S3 boards with 4MB flash, CircuitPython 10.0.0-beta.0 and later require TinyUF2 bootloader version 0.33.0 or later. Older TinyUF2 bootloaders don't provide enough room for the firmware and cannot load it. See the Release Notes for more details, and see Update UF2 Bootloader below.
Alpha development releases are early releases. They are unfinished, are likely to have bugs, and the features they provide may change. Beta releases may have some bugs and unfinished features, but should be suitable for many uses. A Release Candidate (rc) release is considered done and will become the next stable release, assuming no further issues are found.
Please try alpha, beta, and rc releases if you are able. Your testing is invaluable: it helps us uncover and find issues quickly.
Release Notes for 11.0.0-alpha.2
Modules included in this download
_asyncio _bleio _bleio (native) _pixelmap adafruit_bus_device adafruit_pixelbuf aesio alarm analogbufio analogio array atexit binascii bitbangio bitmapfilter bitmaptools board builtins builtins.pow3 busdisplay busio busio.SPI busio.UART codeop collections digitalio displayio dualbank epaperdisplay errno espidf espnow espulp fontio fourwire framebufferio getpass gifio hardwarekey hashlib hmac i2cdisplaybus io ipaddress jpegio json keypad keypad.KeyMatrix keypad.Keys keypad.ShiftRegisterKeys keypad_demux keypad_demux.DemuxKeyMatrix locale lvfontio math mdns memorymap microcontroller msgpack nvm onewireio os os.getenv pulseio pwmio random re rgbmatrix rtc sdcardio sdioio select sharpdisplay socketpool socketpool.socketpool.AF_INET6 ssl storage struct supervisor supervisor.get_setting sys terminalio tilepalettemapper time touchio traceback ulab usb_cdc usb_hid usb_midi vectorio warnings watchdog wifi zlibFeatures: Bluetooth/BTLE, Battery Charging, External Display, USB-C, Wi-Fi
Absolute Newest
Every time we commit new code to CircuitPython we automatically build binaries for each board and language. The binaries are stored on Amazon S3, organized by board, and then by language. These releases are even newer than the development release listed above. Try them if you want the absolute latest and are feeling daring or want to see if a problem has been fixed.
Previous Versions of CircuitPython
All previous releases of CircuitPython are available for download from Amazon S3 through the button below. For very old releases, look in the OLD/ folder for each board. Release notes for each release are available at GitHub button below.
Older releases are useful for testing if you something appears to be broken in a newer release but used to work, or if you have older code that depends on features only available in an older release. Otherwise we recommend using the latest stable release.
Install, Repair, or Update UF2 Bootloader
Latest version: 0.35.0
The UF2 bootloader allows you to load CircuitPython, MakeCode, and Arduino programs. The bootloader itself is not CircuitPython. On Espressif boards, the UF2 bootloader is called TinyUF2. If the TinyUF2 bootloader is installed, you can check its version by looking in the INFO_UF2.TXT file when the BOOT drive is visible (FTHRS2BOOT, MAGTAGBOOT, HOUSEBOOT, etc.)
In general, it is not necessary to update TinyUF2 at every version change. You can read the release notes on GitHub to see what has been changed. Update if you've been told about a necessary change or a bug fix.
Note: CircuitPython 10 and later, on Espressif boards with 4MB flash, requires TinyUF2 0.33.0 or later. The flash partition layout has changed (details).
If TinyUF2 has never been installed on the board, or it was removed by erasing or overwriting the flash, it must be installed in order to flash .uf2 files onto the board. But you don't need the TinyUF2 bootloader to upload .bin files. They can be uploaded using the built-in ROM bootloader, with the Adafruit WebSerial ESPTool or esptool.py.
Warning: Installing the TinyUF2 bootloader will erase everything that was previously on the board. Save any files in CIRCUITPY for which you don't have backups.
There are several ways to install the TinyUF2 bootloader on your board. Check to see if your board's manufacturer provides specific instructions. For Adafruit boards, consult the Factory Reset page in the Learn Guide for your particular board (example).
The easiest way to install TinyUF2 is to use the OPEN INSTALLER button (see above, in the CiruitPython sections). You can also use the Adafruit WebSerial ESPTool, or esptool.py, as described in the Factory Reset page.
- Plug board into a USB port on your computer using a data/sync cable. Make sure it is the only board plugged in, and that a charge-only cable is not being used.
- Press and hold the BOOT button (sometimes marked "B0").
- Press and release the RESET button (sometimes marked "RST").
- Release the BOOT button. This starts the ROM bootloader.
After installing TinyUF2, enter the UF2 bootloader by double-clicking the RESET button. On boards with an RGB status LED, you usually tap reset once, wait for the LED to turn purple, and tap again before the purple goes away. On other boards, consult the board documentation.
If you are updating TinyUF2, look at INFO_UF2.TXT to verify the new version of TinyUF2, by checking the version number. Then you will need to copy the CircuitPython.uf2 file to the BOOT drive.